Concrete Repair using Trowable Mortar
1. Scope of work
A simple step by step guide to preparing and applying Concrete Repair Systems using non-shrink, high strength cementitous mortar.
2. Advantages of troweling system
- Easy to use (only to be mixed with water)
- Can be applied from different thickness
- Good adhesion
- Very smooth surface finish
- The finished mortar is ready to be painted if required
3. Application for concrete repair using cement base mortar
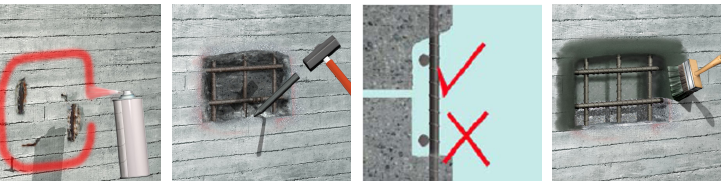
3.1 Substrate preparation
Mark out all of the defective areas of concrete to be removed. The concrete surfaces to be repaired must be free from dust, loose or friable materials, surface contaminants and any other materials which could reduce the bond of the repair materials. In order to achieve these requirements, all delaminated, weak, damaged and deteriorated concrete and where necessary sound concrete, shall be removed by suitable mechanical tools. Remove concrete minimum 15 mm behind main bars.
Bonding agent and anti corrosive layer: Sika Monotop 610 will be applied as treatment for preventing corrosion and as a bonding bridge for concrete repair Sika Monotop products.
3.2 Repair application by hand trow
Sika Monotop R: from 5 to 30 mm application on vertical layer.
Sika Monotop 615 HB: from 5 to 60 mm application on vertical layer. (20 mm overhead)
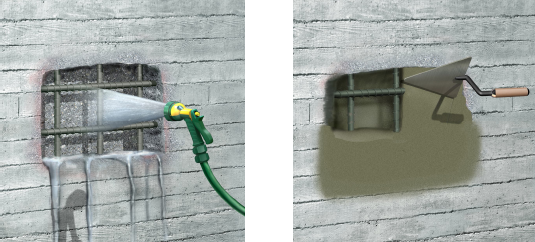
- Wet the substrate
- Wipe away excess water
- Mixing of Sika Monotop repair mortar
- Press firmly the repair mortar into the repair area using a trowel
- Profile surface and finish with trowel
- Finish surface with wooden or PVC trowel for best results.
- Do not spray additional water over the surface!
Protect/cure application from wind, rain, sun by using a plastic sheet or wet jute/hessian.